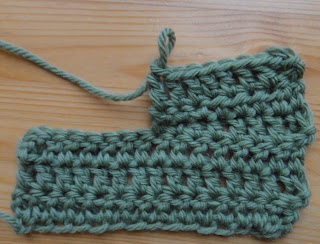
Here I want to show how you can shape a crocheted piece with short rows. My first example is slip stitch crochet, but the same technique can be used with any crochet stitch. For an example with double crochet, scroll down.
First picture, above: The piece is crocheted back and forth with slip stitches worked in the front loop only (F stitches). The two last rows are made shorter (7 sts instead of 14) = short rows. Instructions for the last two rows are: (tch = turning chain)
F 7, tch, turn.
F 7.
The next step is to crochet a long row over the short rows. What I want to show here is how I take advantage of the turning chain to make the short row blend in smoothly. In the picture above, seven stitches are crocheted (of the current row), and the next stitch is supposed to be placed on the row further down. Before I put the hook in the indicated stitch I put it through the turning chain between the short rows.
The stitch is finished. It has an extra loop (at the red arrow).
In a pattern I describe this "jump" to a row further down with a + sign. The row that I am working on is described:
F 7 + 7, tch, turn.
In the next picture I have finished the row and then worked one more row. This way to work over short rows eliminate any bumps or holes in the fabric. The linked turning chain marked.
Here the same thing is worked with a contrasting colour.
With green:
F 7, tch, turn.
F 7.
With yellow:
F 7 + 7, tch, turn.
F 14.
More than one short row at a time. It is also possible to work through two turning chains (from four short rows) at the same point! Above: how the hook should go through both turning chains and the slip stitch. Below: the result after the yellow row and the next row is finished.
F 7, tch, turn.
F 7, tch, turn.
F 7, tch, turn.
F 7.
With yellow:
F 7 + 7, tch turn.
F 14.
*********
Sometimes I find it useful to mention the stitches that are not worked in the end of a row.
It is most often when the number of skipped stitches in the end of a row is relatively small and the number of stitches to be worked is relatively large. You can use the information to double-check the numbers, or just to count the small number of stitches instead of the large number.
Example: The instructions for the green rows (above) are:
F 12, tch, turn, (skip last 2 sts)
F 12, tch, turn
Example 2:
The instructions for the next two green rows are:
F 10, tch, turn, (skip last 2 sts)
F 10, tch, turn
Note that only the 2 stitches on the row immediately under the current row are mentioned as skipped - not the two remaining stitches (or any other) further down!
*********
*********
The principle of linking the end of a short row can be used with any stitches. Here is an example with double crochet.
The start is three rows of dc crocheted back and forth.
The short row is graded like this: 4 dc, 2 hdc, 2 sc.
Make one tch, turn, next row:
3 sc, 3 hdc, 2 dc.
The row after the short rows: start with 8 dc.
If you just continue straight ahead there will be a little hole in the fabric at the end of the short row.
To avoid that I usually link the first dc after the jump. It is done so: Instead of the normal yarn over, start by pulling up a loop from the turning chain of the short row
Now you have two loops on hook. Put the hook in the next stitch and pull up a loop.
Now you have three loops on hook. Continue the dc in the normal way (yarn over, pull through two loops, yarn over, pull through two loops, finished)
The linked stitch is finished. Crochet the rest of the row as normal.
The whole row finished: no hole!


Inga kommentarer:
Skicka en kommentar