

Finally I managed to write down a pattern for these mittens. This is a translation of my Swedish text. Please tell me if you find any errors!
I should also mention that this pattern is for an experienced crocheter, at least experienced in tapestry crochet. I show the working procedure, but do not explain every stitch in detail.
Earlier this year I crocheted pair after pair of mittens while gradually improving the model. I called them Christmas mittens when I first wrote down the Swedish version of the pattern here, but I discovered there are many Christmas mittens... not very unique. So now I have chosen to call them Dahlia mittens, as the Dahlia is a flower with eight petals.

This mitten is not crocheted top-down or bottom-up, but from the thumb-side to the little-finger-side. Big parts of the rounds are vertical on the hand. You crochet it from the right side only, so that you can see what you are doing all the time and can create colorwork (tapestry crochet) without difficulty. Small exceptions from the rule are a few stitches crocheted from back to front. (Read here!)
1 - preparations
Yarn: Viking Alpaca Storm, color grey 513 and red 550I have used 65 grams of grey and 30 grams of red.
Size: for a woman's hand
Hook: 3 mm.
Gauge: Swatch: Crochet a square, using both colors. Crochet in rounds, no turning, with single crochet in the back loop only, 3 stitches in every corner. Gauge should be 21 stitches (or rounds, as in a square it's the same) per 10 cm. In the picture: 17 stitches /8 cm. Change to larger or smaller hook to match gauge.
The whole mitten is crocheted in tapestry crochet: single crochet in the back loop only. The yarn not in use can either be crocheted-in or be kept on the back of the work. In the case you do the latter, remember to twist the yarns regularly to avoid long strands on the inside of the mitten.

Abbreviations:
st, sts - stitch, stitches
ch - chain
slst - slip stitch
sc - single crochet
tc - turning chain
BLO - back loop only
FLO - front loop only
2 - Foundation

All single crochet stitches are worked in the back loop only if not stated otherwise.
To crochet in the back bump - see here.
Left mitten: Ch 5, tc, turn, 5 sc from back to front in the back bump, tc, turn, 5 sc, ch 12, tc, turn, 12 slsts in the back bump - this is the thumb - 2 slsts on the short side of the rectangle, ch 24, tc, turn,
24 slsts in the back bump - this is the index-finger-side of the body of the mitten - 4 sc along the long side of the rectangle, 3 sc in the 5th st, 2 sc along the short side of the rectangle, 3 sc in the first st on next long side.
Right mitten: Ch 5, tc, turn, 5 sc from back to front in the back bump, tc, turn, 5 sc, ch 24, tc, turn,
24 slsts in the back bump - this is the index-finger-side of the body of the mitten - 2 slsts on the short side of the rectangle, ch 12, tc, turn, 12 slsts in the back bump - this is the thumb - 4 sc along the long side of the rectangle, 3 sc in the 5th st, 2 sc along the short side of the rectangle, 3 sc in the first st on next long side.

3. Thumbside

The mittens are crocheted around the foundation in the direction shown in the picture. Crochet in spiralling rounds. Start and end of round is at the point (D) for the left mitten and at (C) for the right mitten.
A = top of the mitten, B = top of the thumb, C-D = bottom, E = angle of thumb
The left mitten is crocheted D-B-E-A-C-D and the right mitten is crocheted C-A-E-B-D-C.
The red arrow represent the back of the hand/mitten. Use chart # 2 for this.
The blue arrow represent the inside of the hand/mitten. Use chart # 3 for this.
Note that the charts should be read from different directions for the left and right mitten!
The half boxes (in top of mitten and top of thumb) should be interpreted as increase (2 sts crocheted in the same st) for rows 1-9 and decrease (2 sts crocheted together) for rounds 11-19.
The top stitches are not included in the charts. Use the background color throughout for these, and also for the corners C and D.
Let the stripes on the inside of the hand continue all the way down to the corner (D).
The green arrows represent the thumb. Use chart # 4 for this. It can be read both for the inside and outside of the thumb. Change the color of stripes on the top of the thumb, but let the top stitch be in background color throughout.

Chart # 2, back of hand

Chart # 3, inside of mitten (above thumb, let the stripes continue down)
 Chart # 4, thumb

 Closing the thumb from the wrong side.
Close the whole thumb down to the angle, and turn it right again. Make a short-row from the first of the 2 sts at the angle (E) down to the corner (D); crochet this short-row from back to front FLO. Turn and work back to the point (E) (normal sc BLO again), include the second (E)-stitch. Finish the rest of the round, increase at the top (A) as before.


Rounds 9-10: Work rounds with increases on either side of the top (A) and with 3 sts in each corner (C and D).


 9. Insert hook in the lower grey loop, pull up a loop.


Insert the hook in a stitch in the bottom edge of the mitten, pull up a loop, ch 15 +1, turn, 15 sc BLO, slst in next 2 sts of the edge, turn, skip these sl sts, 15 sc BLO, tch, turn, repeat around the mitten. It will be 1 row per st. Crochet the cuff together from the inside. Weave in ends.
If you want the cuff to be tighter, change to a smaller hook (2,5 mm).


Rounds 1-4: Crochet around the foundation with the following increases: Increase with 1 st on either side of the top st (A) and 1 st on either side of the top of the thumb (B). For the corners (C) and (D) crochet 3 sts in the same st, always in the middle st of the 3 sts of the previous round. In the angle of the thumb make no increase or decrease.

Above: The left mitten is crocheted 3 rounds on the foundation. The right mitten is crocheted 2 rounds on the foundation. You can already see how the work is beginning to bulge in the angle of the thumb. This is just as it should be! The mitten will be folded here later.
Rounds 5-7: Continue to crochet in spiralling rounds. On each round, increase 1 st on either side of the top (A) and crochet 3 sts in the middle of each bottom corner (C and D). The thumb is decreased with 1 st (crochet 2 sts together) on either side of the top stitch (B).
Round 8, left mitten: From the corner D, crochet up along the thumb until 2 sts remain before the top stitch. Pull up a loop from each of the 5 following sts (the top st and the 2 sts on either side) = 6 loops on hook, yarnover and pull through all loops on hook, = one loop on hook. Turn the thumb inside-out. Change color and close the thumb in the following way: hold the yarn in the middle between the two edges, insert hook in the next st and pull up a loop (= 2 loops on hook), insert hook in the corresponding st on the other side, pull up a loop (=3 loops on hook), pull the last loop through the 2 first, = one loop on hook. The direction of the hook should be pointing from the fabric to the space. This is a version of what I call the "zipper joining method"!

Close the whole thumb down to the angle, and turn it right again. Make a short-row from the first of the 2 sts at the angle (E) down to the corner (D); crochet this short-row from back to front FLO. Turn and work back to the point (E) (normal sc BLO again), include the second (E)-stitch. Finish the rest of the round, increase at the top (A) as before.

Round 8 finished, left mitten.
Round 8, right mitten: Work the start of the round in the same way as previous rounds and crochet up along the thumb until 2 sts remain before the top st. Pull up a loop from each of the 5 following sts (the top st and the 2 sts on either side) = 6 loops on hook, yarnover and pull through all loops on hook, = one loop on hook. Turn the thumb inside-out and close it in the same way as on the left mitten. When you have reached the point (E), turn the thumb right again.
Work down to the corner (D). Make a short-row: Turn, crochet from (D) to (E) from back to front FLO, include the 2 (E)-sts, turn, crochet down to (D) (normal sc BLO again), 3 sts in the corner and finish the round along the bottom edge.
Work down to the corner (D). Make a short-row: Turn, crochet from (D) to (E) from back to front FLO, include the 2 (E)-sts, turn, crochet down to (D) (normal sc BLO again), 3 sts in the corner and finish the round along the bottom edge.

Round 8 finished, right mitten.
Rounds 9-10: Work rounds with increases on either side of the top (A) and with 3 sts in each corner (C and D).
4: Littlefinger-side
This part of the mitten is worked with decreasing rounds.
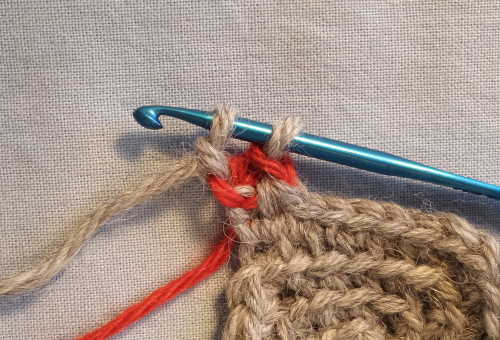
Round 11: Work the two long sides of the mitten; decrease 1 st on either side of the top stitch (A). Continue down to he corner (C) for left mitten, (D) for right mitten. From this corner crochet a new foundation 16 sc sts long, change color between every stitch, see pictures below, and attach it to the corner where the rounds start.

My tutorial for a foundation crocheted out from a corner.

1. Start working with the grey yarn, insert hook in the corner stitch, pull up a loop, yarnover and pull through one loop, = 2 loops on hook. Insert in same stitch, pull up a loop, yarnover and pull through one loop = 3 loops on hook.

2. With red: yarnover and pull through all loops on hook.

3. Insert hook in the lower grey loop and with red yarn: pull up a loop.

4. Yarnover and pull through one loop.

5. With grey: yarnover and pull through both loops on hook.

6. Insert hook in the lower red loop, pull up a loop.
7. Yarnover and pull through one loop

8. With red, yarnover and pull through both loops on hook.


Repeat until desired length.

The foundation is attached at the start of rounds.
Rounds 12-19: These rounds are worked: for left mitten: D-A-C-D and for right mitten: C-A-D-C.
Decrease 1 st on either side of the top st (A) and 2 sts (by working 3 together) in each of the C and D corners.
On the bottom line between C and D work grey on grey and red on red.
Finish row 19 by working 5 sts together in the middle between the 2 mitten-halves. Cut the red yarn.
Betwen the two sides of the mitten is now a space which will be closed by row 20:
Round 20: Work up along the left side until 2 sts remain before the top stitch (A). In a similar manner as with the thumb, crochet 5 sts together, turn the mitten inside out and crochet the sides together. Cut the yarn.

Seen from the side after round 20 is finished.

5: The cuff

Insert the hook in a stitch in the bottom edge of the mitten, pull up a loop, ch 15 +1, turn, 15 sc BLO, slst in next 2 sts of the edge, turn, skip these sl sts, 15 sc BLO, tch, turn, repeat around the mitten. It will be 1 row per st. Crochet the cuff together from the inside. Weave in ends.
If you want the cuff to be tighter, change to a smaller hook (2,5 mm).

Inga kommentarer:
Skicka en kommentar